Saturday, April 30, 2011

Weekends in Sweden

One of the fun things about living over here in Sweden is happening across other Americans who are visiting. A friend and I went over to Marstrand island last weekend with our chickadees for a girl's day out, and ran into this lovely family while we were having a traditional Swedish lunch of fläsk och potatis - which is basically pork cut thinly so it resembles a really thick bacon, and a side of boiled potatoes with seasoning. Yummy! I'm embarrassed now to say I don't remember their names, but they were from Connecticut and hopefully they will check the blog to see their lovely family photo with the island's 350 year old fortress in the background.  Update:  Lucky for me they were checking in so I'm now happy to introduce the Portugal family (Edwin on the right is following Blue Velvet Chair - Hi Edwin!).


They were here to pick up their new Volvo from the main factory in Gothenburg (where I live). Did you know that you can order your Volvo and then come over here, drive it around for up to 6 months, and then they will ship it over to you? You'd be surprised at how many people actually do that. 

Back to Marstrand...it's a small island with a rich history (you can walk around it in about an hour). It's not quite tourist season, so the island was super calm and peaceful as we walked around. An absolutely lovely day! These are the times when their marketing slogan "West coast, best coast!" holds true!


Until next time...
Michael


Friday, April 29, 2011

A Royal Life

Here in Europe all eyes were on England today as we watched Kate Middleton become a real-life princess when she married Prince William in a beautiful Grace Kelly-esque gown. In Sweden we are a little 'crown crazy' all the time - not just for royal weddings - and we have crowns everywhere!


Check out my guest blog over at Home Sweet Homemade where you'll find royal inspiration' from Scandinavia.


There's lots more to see in my post over at Home Sweet Homemade so make sure and hop over now.

Until next time...
Mike

Guest Blog Exchange with Home Sweet Homemade

A big welcome to Diane from Home Sweet Homemade. Diane's blog header inspired my button flower bouquet - and she's my guest blogger today! Take it away, Diane.


Thank you Michael!  I'm so happy to be here at the Blue Velvet Chair!  I first spied Michael's blog at a linky-party where she had posted one of her delightful mosaic projects.  And I became an instant fan.  Her creativity and friendliness virtually sparkles through her blog and the fact that she's living in Sweden is so intriguing to me.  (Scandinavia is, after all, the home of Hamlet.)  I'm completely thrilled to be Michael's guest today and even more thrilled to host her over at my blog, home sweet homemade.

* *** *
Every once in a while, I see an image that just captures my imagination and I'll find myself hunting around dozens of blogs for more.  That's how the "things I love" posts are born.

things I love - the faux fireplace edition

Years ago, travel was part of my work life.  On a 6-month project in Chicago, I was fortunate to rent a room from a local homeowner just north of the loop, rather than stay in a hotel.  The guest room in her charming home had a non-working wood-burning stove against one wall.  The homeowner had cleverly arranged some bricks on the floor to resemble a hearth and a shelf above for a mantel.  The look was totally faux, but the room's warmth completely genuine.

My design lesson from that experience was that it is indeed possible to enjoy the psychological benefits of a fireplace without actually having one in a room.  Let's look at a few examples, shall we?

This cozy room with the gorgeous antique fireplace mantel is from the home of Gloria Oviatt, esteemed dealer of American antiques.  Image via Cote de Texas.


Suzanne, the inspired blogger behind Meridian Road, was fortunate enough to find a reproduction of an antique fireplace surround, virtually indistinguishable from the original.  She and her husband snapped it up in a flash and placed it in their home as a charming focal point.


Emma Cassi, jewelry designer and interior stylist, drenched her bedroom in old-world romance with this beautiful fireplace mantel.  Image from design*sponge.


Also from design*sponge, a diy-artist converted a sadly used mantel into a whimsically scrumptious faux fireplace.


Regardless of the season, everyone loves a fireplace -- chimney not necessarily required.

Thank you for reading :)
-diane

Tuesday, April 26, 2011

DIY - Chandelier Tutorial in Pictures

I gave this little ol' lady a new home and a new life. I hope you enjoy my chandelier renovation pictorial.


Sending a super huge THANKS and BLUG (that's my word for blog hug) to Roeshel at The DIY Showoff for letting me showcase LuLu's before and after shots over at her place.

Until next time...
Michael

p.s.  If you enjoyed this post, I hope you'll become a follower of my blog and a fan on FB.

Timerhttp://www.facebookloginhut.com/facebook-login/


Also linked at these great parties!


Saturday, April 23, 2011

Blog Tips: Blog Hops

Do you like to broaden your blog world knowledge like I do? Today's tip focuses on Blog Hops. Check out Blog Hops for an easy way to find new bloggers that share similar interests and new blog world connections. Here's several for you to hop over to just in time for Easter!

Smart and Trendy MomsFirst, there's the Social Parade over at Smart and Trendy Moms.


A Mommy's Sweet Blog Design Friday Blog HopNext hop on over to A Mommy's Sweet Blog Design where she has a fun Friday blog hop as well as adorable blog templates for a low price and great blog tutorials for us newbies.


Kim at Chubby Cheeks Thinks not only offers a weekly blog hop, but also lots of product reviews and giveaways.


Stalk Hop FridayMrs. Marine has a direct connect to the U.S. military efforts, so support your local military family.


Real Mom Reviews shares not only their blog hop, but other good tips for bloggers.


Okay, there are your first five Blog Hops to check out if you aren't already hoppin'.  I'll post more in the coming weeks so that you have lots of opportunities to find new connections and like-minded bloggers.  Have fun!

Until next time...
Michael


Wednesday, April 20, 2011

Blog Tips: It Takes a Blog Village

The folks behind The Blog Guidebook have started a new Blog Club program that links a group of 5-6 bloggers together to provide support, ideas and inspiration for each other. What a great idea...I'm in!

Shortly after signing up I received my group info, and I now have 5 other blogging friends that are dedicated to providing me with information and inspiration to develop my best blog - and I will do the same for them. After all, it takes a BLOG village ;-)

Check out the program at The Blog Guidebook for yourself, and check out my newest blogging buddies.

Helen at The Blog Exhibit is passionate about helping other women establish a lifestyle that suits them, including earning money while staying focused on family. She's also obsessed with all-things-coffee and the country design associated with it, and is true to her faith.


Also new to the blogging world is Alli at Smalli Cat. I love the happiness and cleanliness of her blog template. She's sharing the things in her life that bring happiness.


If I just looked at the colors and the design aesthetic of Lisa's blog header at Joyful Jones, I would almost think she was Scandinavian! After an interrupted break in blogging, she's back to share her style of joy-filled living. Lisa also has a great giveaway with a $10 Barnes and Noble gift card, a Nicholas Sparks book, and a book tote - so get over the today to enter!


Kelly with Coupons, Crafts and Causes has merged her love of bargain shopping, crafts, and charitable giving/volunteerism. She provides information honed from her own years of learning to live thriftly and wisely combined with the handcraft skills past to her from her Grandmother.


Oh My Moomin is the blog face for Anne, who blogs about all things interesting under the sun. She's also challenged herself with the blog to see if she can finally keep a project going. There's no button yet for Anne...but we'll help her to get one soon :-)


There you have it. My latest blog therapy group. Visit The Blog Guidebook if you want to get involved in a support group of your own.

Until next time...
Michael

Tuesday, April 19, 2011

Happy Hubcap Flower DIY

How many of you have driven past lost and abandoned hubcaps on the side of the road and thought to yourself, "I could do something with those!" Well...I thought that exact thing for years and finally did something about it! It all started with a quick roadside hubcap hunt (mentioned in DIY Sneak Peek post a little over a week ago), which made me the proud owner of a Saab, a Volvo, and an Audi all at once...the only time I'll ever say that in my lifetime!

Hur många av er har kört förbi tappade navkapslar på sidan av vägen och tänkte, "Jag skulle kunna göra något med dem!" Tja ... Jag trodde likadant i flera år och äntligen gjorde jag något åt ​​det! Det  började med en snabb navkapseljakt på sidan av vägen och jag blev stolt ägare av en Saab, en Volvo och en Audi - den enda gången jag någonsin kommer att säga så under min livstid!

So, home to the bathtub they went for a good scrub - which also provided me with the necessary motivation to give my bathtub a good cleaning afterwards. Bonus!

Jag använde badkaret för att tvätta navkaselarna - vilket också gett mig den motivation som krävs för att ge mitt badkar en bra rengöring efteråt. Bonus!


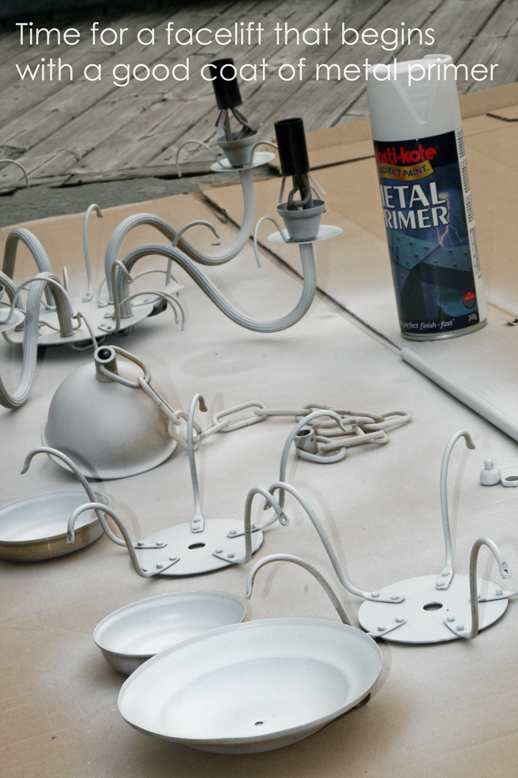
I applied a quick coat of spray primer - didn't worry about full coverage...just enough to give the plastic hubcaps a bit of support to hold the paint. Remember when hubcaps were actually metal? Nowadays they are so lightweight, so I already knew I wanted to create a 'wall garden'. I left one of the hubcaps turned over in the photo so that you could see that I didn't worry about getting all the grease and grime off the back sides...it won't show in the end, so no problem to skip that step and save yourself some time.

Jag målade med ett snabbt lager 'spray primer' - oroa dig inte om det inte täcks helt, bara tillräckligt för att ge plasten lite stöd för att hålla färgen. Kommer du ihåg när navkapslarna var av metall? Numera är de så lätta att jag redan visste att jag ville skapa en "vägg​​trädgård". Jag lämnade en av navkapslarna lutande på bilden så att man kan se att jag inte har tagit bort allt fett och smuts från baksidan - det kommer inte att visas på slutet, så hoppa det steget och spara lite tid.


I found zip ties (cable ties) in the garage and attached them around the openings at the outer edge of the hubcap (we had two different lengths as luck would have it). These would be my petals.

Sedan tog jag buntband som fanns i garaget och satte dem runt öppningarna på den yttre kanten. Dessa kommer bli kronblad.


And now for my favorite part...spray painting!

Och nu till min favorit - sprutmålning!


In the photo above, you get a sneak peek at the other two flowers that will be added to my wall garden when I get them finished later this week. I painted a bright blue center to contrast with the pink/purple color chosen for the flower. It's okay if the edges bleed together a bit...makes it feel a little more airbrushed.

På bilden ovan får du en tjuvtitt på de andra två blommorna som kommer att läggas till min väggträdgård när dem är färdiga senare i veckan. Jag målade mitten blå som kontrast till den rosa / lila färg som valts för blomman. Det är okej om kanterna blöder ihop lite och gör att det känns lite mer airbrushed.


Making this flower not only forced me to give my bathtub a good scrub, it also provided one of my overgrown bushes outside with a nice springtime trim when I needed some branches to use for my flower stems. The leaves are made from plastic strapping - the kind that comes around boxes to hold them together during shipping. A quick trip to the back side of a local home improvement store gave me what I needed...and I even scored a couple of green straps that were perfect for this project.

Detta projekt resulterade inte bara i ett rent badkar utan också vältrimmade buskar utanför huset då jag behövde några grenar att använda som blomstjälkar. Bladen är gjorda av plastband - den sort som kommer runt lådor för att hålla dem samman under transporten. En snabb bilresa till baksidan av Bauhaus gav mig vad jag behövde och jag fick även ett par gröna band som var perfekt för detta projekt.


I simply cut a length of the plastic strapping and used a staple gun to hold it in place.

Jag skar en bit plastband och använde en häftpistol för att hålla dem på plats.


More fun with spray painting! This time with green.

Mer kul med sprutmålning! Denna gång med grönt.


After my first failed attempt at giving the flower center a final flourish (it looked more like a boob than a flourish), I opted for some flat glass beads that I've had stuffed in a drawer for forever...they gave just enough flourish. I used an all-purpose clear bonding glue (kinda like super glue) that worked a charm.

Efter mitt första misslyckade försök till att ge blommans centrum 'bling' (det såg mer ut som en bröstvårta än bling), valde jag några platta glaspärlor som jag har haft stoppade i en låda i evigheter och de gav precis tillräckligt bling. Jag använde ett universallim som funkade bra.


Ah, there she is. Flora, the first bloom on my wall garden. I put a wire hook on her back side - easy to do because there are so many hook openings or wires already on the back of the hubcap - and hung her on an existing screw that was coming out of our brick home. The stem is simply supported by the ground and the flower, but it will soon get its own little support to keep it attached to the wall properly.

Ah, där är hon. Flora, den första blomningen på min väggträdgård. Jag lägger en trådkrok på hennes baksida - lätt att göra eftersom det finns så många öppningar eller ledninga på baksidan av navkapseln - och hängde henne på en befintlig skruv på vår tegelvägg. Stammen stöds av marken och blomman, men den kommer snart att få ett eget stöd för att hålla fast den på väggen ordentligt.


The wall - soon to be wall garden - is just begging for more of these colorful little bits of eye candy. I can't wait to get the others finished.

Väggen - som snart blir väggträdgård - bara tigger om fler av detta färgglada ögongodis. Jag kan inte vänta tills dem andra är klara.


I hope you'll stop by Blue Velvet Chair later this week to see if the wall garden has bloomed! And I can't wait to see some happy hubcap flowers bloom in your garden soon.

Jag hoppas att du snart kommer på besök igen till Blue Velvet Chair senare denna vecka för att se om väggträdgården har blommat! Och jag kan inte vänta att se några glada navkapselblommor blomma i din trädgård snart.

Another big thanks to Jackie over at Simple Home Life for the guest blog exchange this week and letting me showcase my flower.

Until next time...
Tills nästa gång...
Michael

p.s.  If you enjoyed this post, I hope you'll become a follower of my blog and a fan on FB.

Timerhttp://www.facebookloginhut.com/facebook-login/

Visit thecsiproject.com

Also linked to these fun link parties!
Related Post for bluevelvetchair.blogspot.com