Tuesday, February 28, 2012

Ottoman DIY


We finally did it! A full year after we built the frame, we actually finished the oversized ottoman for our living room.  Spoiler...it's not recycled, nor is it repurposed.


Why did it take a year? Well, that's how long it took me to finally commit to a fabric and find the right legs. When my Swedish man helped build the frame last year, we actually had a fabric to put on it...that was too short to go all the way around - this despite being on the phone with my husband while at the fabric store to get the measurements from him to be sure. Does that ever happen to you? Doesn't he realize that fabric can't be returned if it doesn't fit? And my first intent to recycle legs from a piece of thrift store furniture flew out the window after several months of searching. Do you know how hard it is to find turned wooden legs in the land of clean Swedish design? It's 1 year worth of hard! So I finally found a nice small business in Scotland with crazy good prices and had a box of legs sent over.


The poor thing sat dejected on piles of books in the middle of our living room for 1 year! And let me tell you, when you have two kids under the age of 10 who seem to believe that our living room is their own personal gymnastics facility, those books didn't have a chance. We were constantly lifting up the ottoman to restack those books underneath. 


Does it kill me that I wasn't able to get some recycled or repurposed features in it? Sure. But I also know that my design style is a funny blend of second hand, new, and repurposed. And when I look around at the furniture pieces in my living room, this is the only new piece...and we made it! It's not even store bought. We got exactly what we wanted - an oversized ottoman that could serve as a coffee table, extra seating, a foot rest for everyone who visits, and a gymnastic vault for the kids.


I love it! BUT...I don't think it's actually done yet. I'm actually toying with the idea of painting a design on the fabric. The pattern choices are marinating in my brain and we'll see if anything comes of it. I'm thinking darker blue swirls or square-ish shapes 'stamped' on with a DIY screenprint-style stamp on recycled styrofoam a la The Meta Picture. What do you think? Do I dare? I have some extra fabric to try some sample work beforehand, so that reduces the risk a bit.

Interested in making your own ottoman?  I'll tell you how we did it later this week.


And if you are like me, you enjoy peeking into other's houses to see their design style. So I thought I would also create a post this week with a little tour of our living room, including some 'before' pics when we moved into the house over 3 years ago. Our remodel process is slower than I'd like, but I'll start posting some mini tours so you can have a peek around. 

Until next time...
Mike


Stumble this post

A Day's Worth of Inspiration - Repurposed

Some of the repurposed DIY finds for today are just too delicious not to share. Scroll down through the pics for a quick inspiration boost as we move on into this week.

(comes with a great tutorial)
Patenteux du Nord


Kara Pasley Designs


Alisa Burke


BHG via Pinterest


Patenteux du Nord


(I'd like to see this oversized!)
Passionfly via Instructables


Coffee with the Mrs.


MrBalleng via Instructables


Cassettes Delight


Sassy Crafter


Sassy Crafter


Do you have plans for creating this week?

Until next time...
Mike


Stumble this post

Sunday, February 26, 2012

DIY Tutorial - Recycled Tie Dress


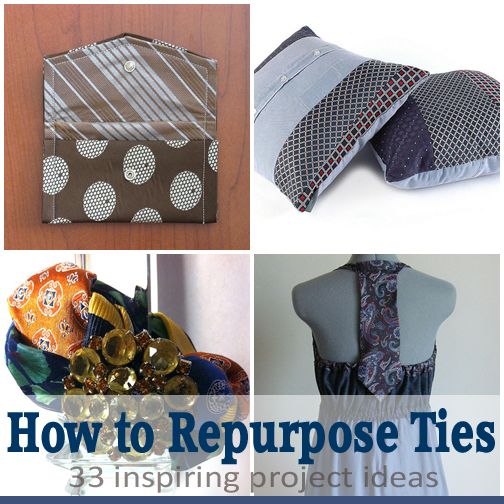
Before we begin, don't miss the post this week with 33 inspirational recycled tie projects, and a few more at Pinterest.

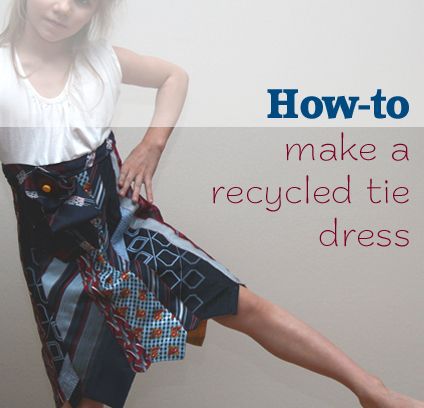
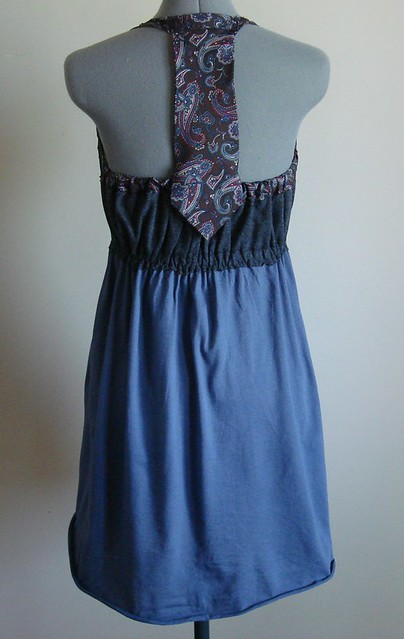
Last weekend I finished an experiment that had been on my 'must try' list for quite a while - 
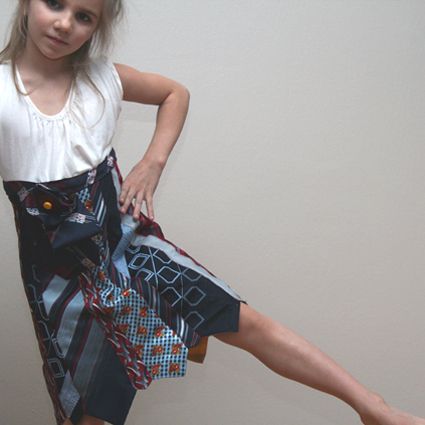
a recycled tie dress for my Divine Little Miss M. And although it was a serious sewing hack, I'm quite pleased with the results...and so was M.

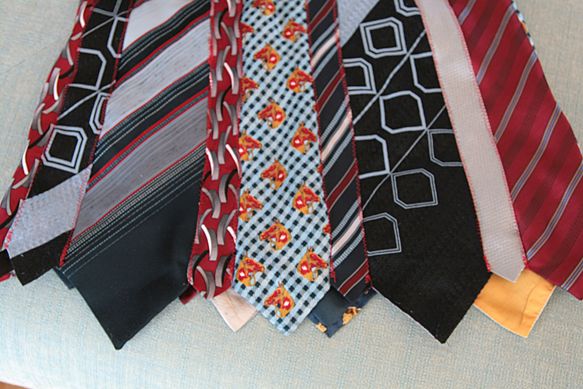
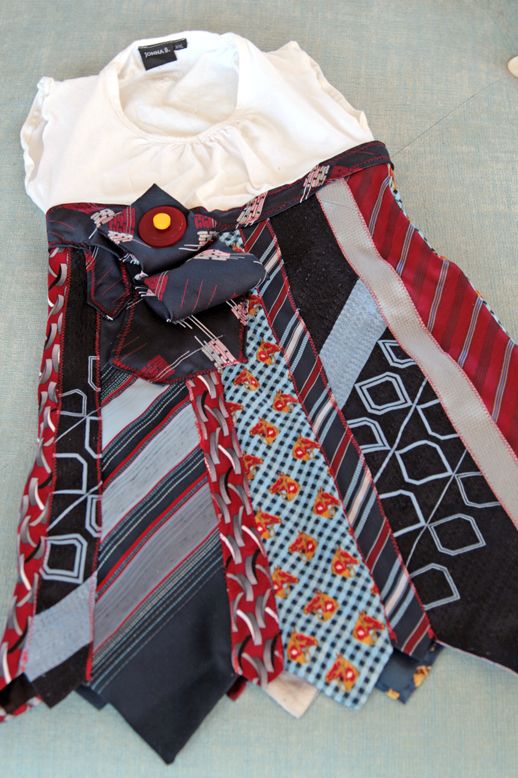
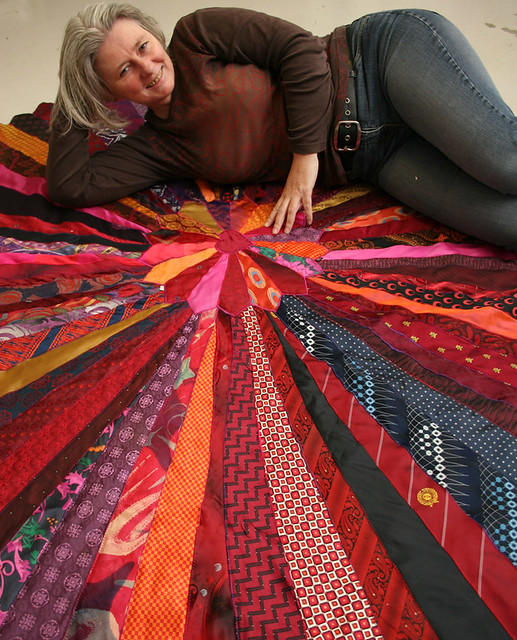
I promised a DIY tutorial for my recycled tie dress - despite the fact that I am far from a real seamstress. Before you start make sure that you've gathered a fun selection of used ties with similar color hues but different patterns. I chose blue and red as an overall color mood, but you'll see pops of gray and yellow as well. Several of the ties came from thrifting and a couple came from the closet of my friend's husband.  To give you an idea of the number of ties you'll need, this dress is for a 7-year old and I used 10 ties - 9 for the skirt and 1 around the waist where the ties and Tshirt are sewn together.

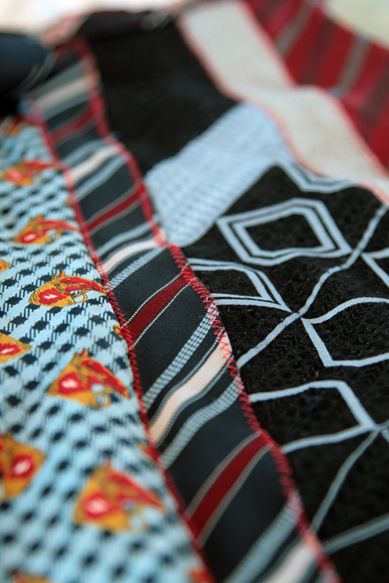
Cut your ties in half so that you are now working with a wider piece (front of tie) and a thinner piece (back of tie). I laid them out with alternating widths (wide, thin, wide, thin...) and mixing so that the matching backs were several ties away from the fronts. The nice thing is that the ends already have beautiful seams, so I left them as is and decided to sew the ties together side-by-side with just a very small amount of overlap (1/4 inch).


I pinned two ties together (both right side facing up with just a bit of overlap) and used a zigzag stitch on the '2' setting on the sewing machine. Then I pinned the next tie and did the same, continuing until I had enough to wrap around Little Miss M's waist. This is part of the hack - I don't use patterns and I do a LOT of eyeballing. Both sides of the thinner tie sections were always on top of the ties beside them, and I started sewing from the pointed end going upward. Because the front side of the ties are wider at the pointed bottom, it gave the natural A-line needed for the skirt to flare out a bit at the bottom.

I could have used a contrasting thread like yellow to give the skirt a more eclectic personality, but I chose to stay with the red and blue color mood, so I used a red thread - which still gave a nice effect against the ties. 


Now, if you remember my last sewing experiment with the 
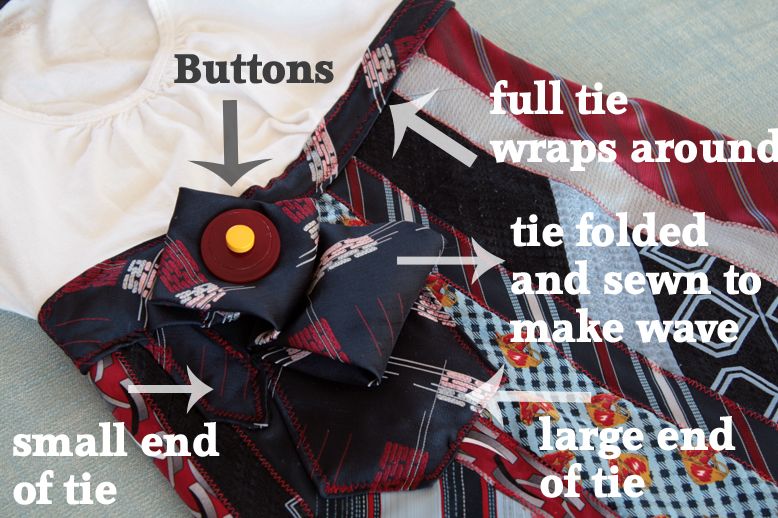
sweater skirt made from recycled winter scarves, you'll know that I will do almost anything to avoid sewing a waist. I just don't know how to do it. So, to hack my way around it this time, I decided to take one of my old Tshirts that I had in the 'do something with this' pile, and I cut off the side seams straight up to the shoulders (cutting off arms as well). After another eyeball on Miss M to see how much the V-neck needed to be lifted, I sewed a new seam across the shoulders, sewed new side seams, and created a seam around the new arm holes. And because I don't know the proper seams to use with Tshirt material, I always seem to get that slight ruffled effect (at least I tell myself it's a ruffle effect). Does anyone know the right seam and stitch size to get a flat seam on Tshirt material? PLEASE tell me!


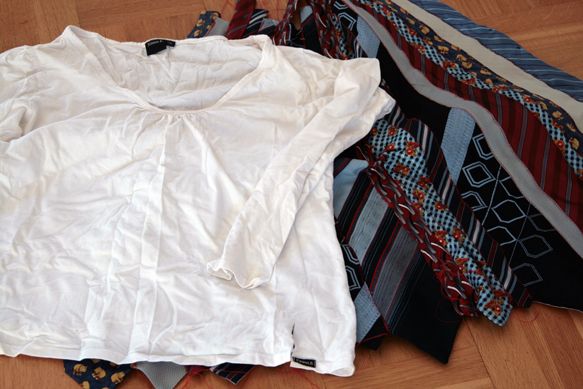
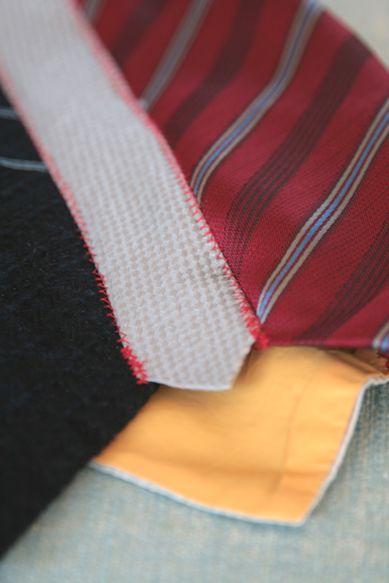
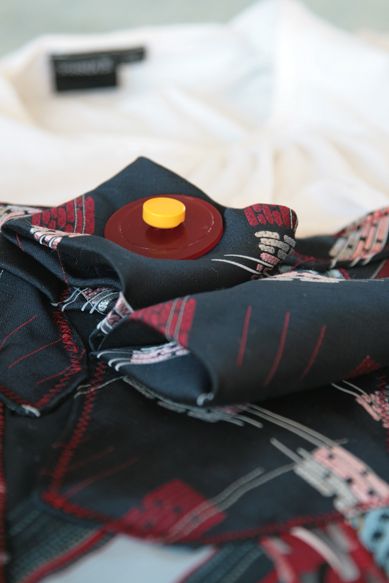
Next I just tucked that downsized white Tshirt down inside the tie skirt and sewed a zigzag seam right along the outside. I first thought that I was going to leave it with the seam exposed, but decided to give it a more 'finished' look by taking one more tie and wrapping it around the waistline. Then I simply zigzagged both sides of the tie all the way around. On the front side, I created a little 'free-flow' design with the ends of the tie and just sewed across the tie underneath each fold. I finished the little free-flow design by sewing on two buttons.


That free-flow design was inspired by the great recycled tie creations at Ties & Whimsy in Australia, so make sure to check those out if you plan to do anything for yourself.


And there you have it. This tutorial is about as hacked as the sewing job was, but I hope it gives you enough of a hint and enough inspiration to try your own.

One thing I would change if I were a better seamstress would be the upper part of the dress. The tie skirt is quite heavy compared to the Tshirt material up top and it pulls on it just a bit too much. This dress would be perfect with a white button down upper part - and if I knew how to downsize a man's button down to a kid's button down like this one below from Dana Made It, I think that would have made this recycled tie dress even better (I would only need the upper part of this re-do below).


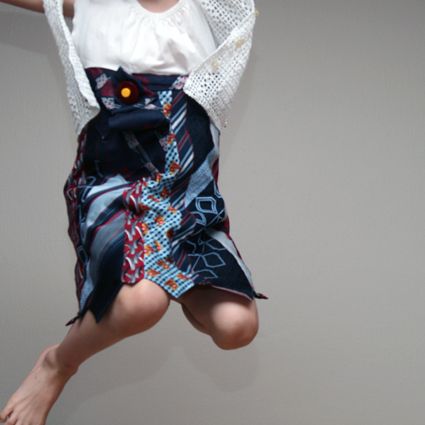
But, all that aside, Divine Little Miss M was pleased with her new dress experiment - and she gave it a whirl to make sure that all parts were working.


Don't miss the post earlier this week with over 30 inspiring ideas of what to do with recycled ties. There is something a bit luxurious about tie fabric and patterns, and there are some great projects out there to try.

Until next time...
Mike


Stumble this post


I'm also partying at these fun linky parties!

Friday, February 24, 2012

DIY Inspiration - Recycled Ties


Pin It


Before we begin, there's a few more ties gathering over on my recycled ties Pinterest board - so feel free to hop over, and make sure to let me know if you have, or have seen great tie projects to add.

Last weekend I had ties on my mind with the creation of a recycled tie dress for my Divine Little Miss M. So I thought it would be fun to put together a collection of some fabulous recycled and repurposed tie creations out there - the kinds that will have you running to your nearest thrift store to scoop up loads of ties and get busy creating. Ready?


My Purple Crayon


bacopa67


Liz Tibo Creations


Better n Before


Ties 2 Pillows


Michelle Claire Textiles


loscann


Atticus Finch NZ


Fabrications-Hackney


Blue Velvet Chair


OutsaPop Trashion


Painted Oyster


Mahar Dry Goods


Burris_Angela


Rayela Art


Studio Fashion


Electric Nomad


eileenaway


Keira Morgan


Michelle Claire Textiles


Laura Skelton


groundsel


OutsaPop Trashion


Suzanne Shenkman Designs


Art 2 the Extreme


Tiger Tea


Suzanne Shenkman Designs


Wild Hare Fiber


By Melissa


Ties 2 Pillows


Senseless Art


Tomate d'epingles


Lisnaweary Quilts


Inspired yet? These projects were all discovered on Flickr  - and I'm sure there are so many more to be found across the Web. Let me know if you've recycled or repurposed ties by leaving a comment here or on the Blue Velvet Chair Facebook page

And before signing off, I ran across these two pics below that I thought would also be fun to share.


Ingrid Goldbloom Bloch


This guy just cracks me up. Repurposed ties back in 1988!


Do you have a specific collection that you'd like me to put together? Let me know and I'll get working on it!

Until next time...
Mike


Stumble this post

Related Post for bluevelvetchair.blogspot.com