Wednesday, November 30, 2011

Make It Merry - 14 Days and 14 DIY Ideas

It's my turn to show and tell for the Make It Merry event - 14 days and 14 DIY ideas for the holidays! This is day 6, but it's not too late to catch up with the previous ideas by clicking on the calendar at the bottom of this post. Inspiration abounds and I promise you won't be disappointed by the projects posted by my fellow bloggers from the Make It Merry event.

Here's the sneak peek at my "Forest Funky" advent calendar that I'll be featuring today.


Just a bit of logistics. I've got so many photos for this project so I hope that everyone can easily load this post. I'll also post all the photos on the Blue Velvet Chair facebook page if you're interested. And now, time to show and tell!

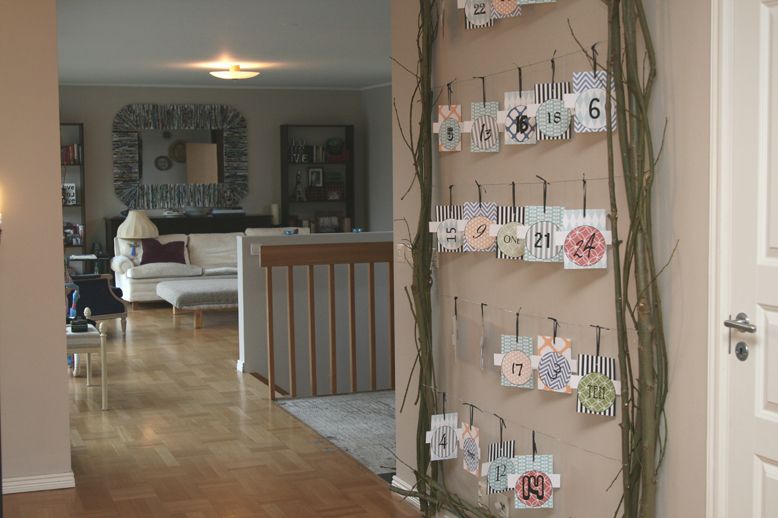
When my kids started to ask for their typical annual advent calendars this year, I suggested that we make a big one for an empty wall in our dining area. They jumped aboard and I'm so glad they did, because this one also doubles as holiday decor. It all started with a pretty good pile of twigs and branches collected from the forest - there's no shortage of forest in Sweden - some screws, and a drill used as a screwdriver.


My dining room floor became my workroom and I grabbed the largest branches to make a frame which I screwed together at the corners. Then I began weaving smaller branches in and around the main branches that formed the frame. No more screws, no glue, just weaving and twisting.


Next I headed downstairs to print out some fun numbers and backgrounds. I decided to use the free backgrounds by Aimee at Sprik Space. I mentioned these backgrounds a couple of months ago when I made some business cards for a market, and I like them so much that I decided they would be perfect for our forest funky advent calendar.


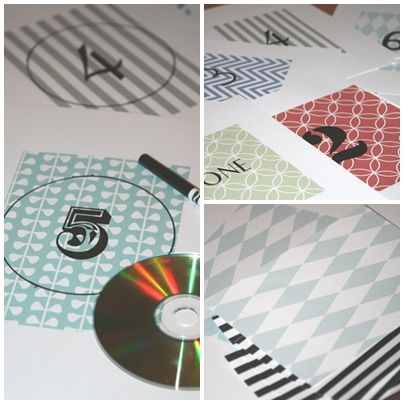
I used Photoshop to print numbers in different fonts on the backgrounds from Aimee after I resized her files to a 5x7 size (A5 for the Europeans), and then used a CD to draw a circle around the numbers. There's no Silhouette in this household, so off I went to cut the circles out by hand. If you cut on the outside of the black line there will be a little black border left on the circles to give that extra accent. I also printed some 5x7 backgrounds without numbers and used them as the backdrop for the circles. I arranged everything on the floor to get the right colors and balance before I started gluing.


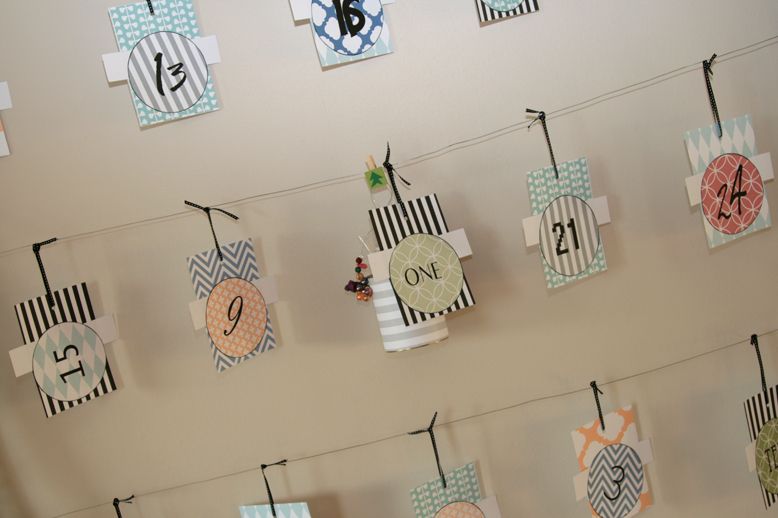
After a big of gluing and punching holes in each card (single hole punch), I used a nice little black and white ribbon to string the dates randomly on the forest frame.


Now my forest funky advent calendar was almost done...and just in the nick of time (since it starts tomorrow)! Here's how the kids will see it...


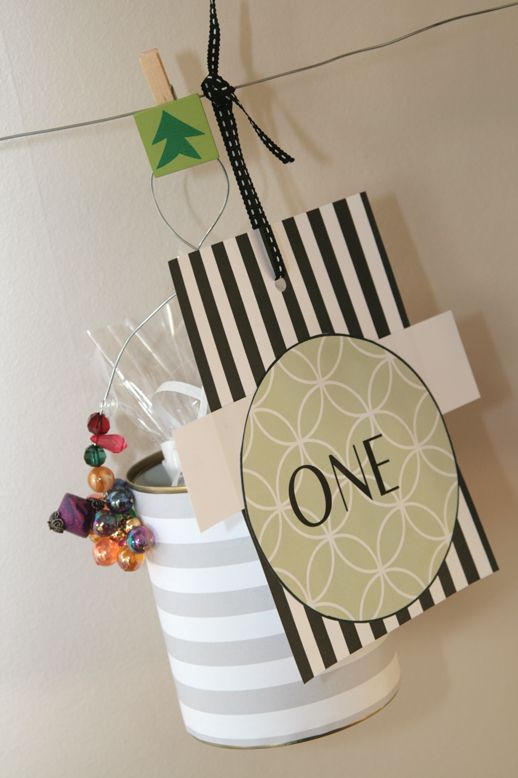
But what about the little surprises? Well...I have a son who just can't resist a good peek when given the chance. So instead of hanging all the little goodies on the advent calendar at once, I've made a little traveling surprise carrier that will move from day to day according to the date. All you need is a tin can, one of the printed backgrounds, a bit of ol' wire and some beads. I started with buttons (as you see in the supplies photo), but wasn't getting the effect right, so I switched to beads.


I don't know about your kids, but mine are at the age where they are really curious about their baby photos and what they did when they were younger. So several of the dates on the advent calendar this year will hold a little gift of memories from previous Christmas holidays. Day 1 includes a little packet of mini photos that I printed out for them to have - they can carry them around, bend them, put their little fingerprints all over them, and do the things that kids normally do with photos that we parents cringe over. This is their own little set. They show our Christmas from 2008 when we flew to the Canary Islands for a sunny getaway during Sweden's dark winter. It was one of our best Christmas holidays ever!


OK. Snapped back to reality!

Their first little surprise packet holds Christmas memories - and of course a little something sweet.


Wrap up the little goodies in some cellophane paper for the traveling carrier. To make the carrier, simply glue the paper to the can, string the beads on your wire, punch a couple of holes in the sides of the tin can, and you'll be able to figure out the rest.  


Held by a little clothes pin, the traveling carrier will have new surprises on each date when the kids wake up.


And there you have it. The forest funky advent calendar. 


Couldn't let the scraps go to waste from the circle cut-outs, so I cut some pieces and made a paper mosaic tree for the bottom of the advent calendar.


The forest frame will also double as our Christmas card holder this year.


Whew! Just one more photo to go. I hope that my forest funky advent calendar gives you a little inspiration to create something special and 'uniquely you' this holiday season. 


Click through for more inspiration on the Make It Merry graphic below.

And a big thanks to Diane at Home Sweet Homemade for putting together a fabulous event filled with inspiring creatives. Diane has been a big part of my own inspiration for button flowers and rolled magazine pages.

Until next time...
Mike

Stumble this post


Nifty Thrifty Things
home sweet homemade
Project Possessed
Blue Velvet Chair
homework
Meridian Road
Modern Country Style
Truly Lovely
Jill Ruth & Co.
Rustique Art
hello lovely inc.
Decor to Adore
Inspire Me Heather
Ladybird Ln
Image Map

Tuesday, November 29, 2011

Creating Success Around the World - Ina Olavarria

What do I love most about hosting the European leg of the Creating Success Around the World global blog hop? The interaction with artisans from diverse cultural backgrounds, and the realization of how similar we are despite our differences.


Sure, I might sound a bit daft when I use Google Translate to send off my interview questions - but I do it with the best of intentions to allow the creative that I'm interviewing to communicate in the comfort of their own language. I just recently read that Facebook has reduced the 6 degrees of separation to 4 with their social media conglomerate. Surely Google Translate also contributes to making the world smaller, one questionably translated communication at a time. This week I'll be trying to translate Ina's interview to English, but I've also decided to post her replies in their original Spanish form as well.

Now, on to the show.


This week's European creative showcase:
Ina Olavarria

Who:  Ina at Ina Olavarria
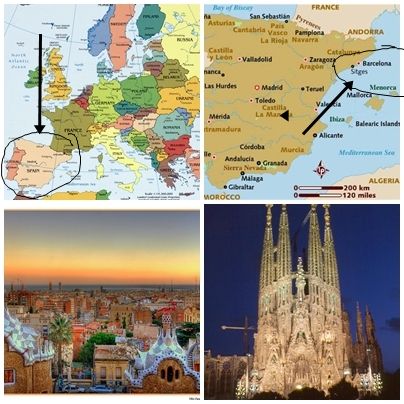
Where:  Barcelona, Spain

If you missed it, I recently wrote an article for Artizen Magazine that showcased the recycled art festival Drap-Art 2011 in Barcelona (page 30). Ina was featured in that article and I wanted to take this chance to ask Ina a few more questions for our global blog hop.


BVC:  When did your passion for recycled art begin?
Ina:  It began small when I recycled my own clothes or those I found in flea markets, then transformed to give them a new life.
Desde pequeña que reciclo mi propia ropa o la que encuentro en mercados de segunda mano, para luego trasformarlas y darles una nueva  vida.


BVC:  Do you work full time as an artist, or do you also have a "day job?
Ina:  It's hard to devote to creative work, it requires years of experience. I am slowly developing projects that in some way or another relate to art and design, which are an increasingly important part of my income.
Es dificil dedicarse por completo al trabajo creativo, esto requiere años de experiencia.
Yo poco a poco voy desarrollando proyectos que de alguna u otra manera se relacionan con el arte y el diseño, los cuales son una parte cada vez mas importante de mis ingresos.

(note from BVC:  Ina also holds creative workshops, and my favorite is the 'Arms and Hugs' where she uses children's natural movements to weave recycled clothing)


BVC:  Do you have any tips for others who want to sell their creations?
Ina:  Have a good design in the right place. In other words, create something that your target audience wants and find the right place to sell where your products are valued accordingly. One example is the designer who organized the 2010 study "Knitwear" with other artists in Barcelona, where the products were exposed as a work of art and people could watch as we created.
Un buen diseño en el sitio correcto,,,me refiero a crear algo en coherencia al publico a quien va dirigido y buscar un espacio donde sean valorados dentro de su mismo contexto al momento de venderlos. Un ejemplo son los diseños que desarrolle mientras compartia estudio el 2010 en "Generos de punta" con otros artistas en barcelona donde los productos eran expuestos a modo de obra de arte y donde la gente podia ver directamente como los haciamos. 


BVC:  What is the do-it-yourself (DIY) and crafts in Spain?
Ina:  There are groups in Spain that are promoting creative recycling, like Makea in Valencia  and Truca rec in el Pais Vasco. Thanks to these organizations and other workships that are held at community centers and organizations, a culture of DIY has developed. In Barcelona we focus on Reparat Millor que Nou.
Existen colectivos que promueven esta manera de promover el reciclaje en españa como Makea en Valencia y Truca rec en el Pais Vasco. Gracias a esto y a muchos talleres que se realizan a nivel de centros civicos o asociaciones, se va creando una cultura de DIY. En Barcelona podemos destacar el trabajo de Reparat Millor que Nou.

(note from BVC:  Reparat Millor que Nou is an organization and structure that provides the facilities and know-how to repair, upcycle or exchange existing items. Millor que Nou translates to 'better than new', and includes initiatives for 2nd hand markets, self-repair, training, markets and exchange sites - all with the intention to recycle and reuse).  


BVC:  What is your "dream" project?
Ina:  A clothes forest, full of color and textures.
Intervenir un bosque con ropa, llenandolo de color y texturas.


BVC:  Can you share three artists who use recycled items that you think our readers should see?
Ina:


Karol + Bergeret


Andrea Crews


Basurama


BVC:  Fill in the blanks: If I were in Paris, I...
Ina:  ...would go to the flea markets.
...daria un paseo por el mercado de las pulgas.


If you'd like to catch up with past global blog hop interviews for Europe, check out:
Made by iSa (France)
Handmade by Kallaristi (Greece)
Annemarie's Haakblog (the Netherlands)


Now it's time for you to hop over to see who's been discovered in North America, Australia, or Asia.


Are you also in Europe and would like to be considered for an interview feature? Leave me a comment at the end of the post, or send an e-mail with your website/blog.

**Don't forget to add your own blog or website to the link party below to connect with new creative soulmates from across the world.


Until next time...
Mike


Monday, November 28, 2011

I've Been Converted! (Wreaths)

I'm not a wreath person. But after drooling at 70 fabulously unique and (often) repurposed or recycled wreaths over at Under the Table and Dreaming, I've been converted!  I'll share a few of my favorites here, but you just absolutely must see the entire collection.

brooch glam wreath at Better Homes and Gardens


red crayon wreath at Nesting Newbies


popcorn wreath at Food Network 


A huge blog nod of appreciation to Stephanie Lynn at Under the Table and Dreaming...I know how long it takes to put these collections together and you really have found the best of the best.

Hop over to view the entire collection. These are my favorites, although I'm afraid of a Hitchcock-inspired scene of The Birds outside my door if I were to hang that popcorn wreath. After you've had a look, pop back over to let me know which was your favorite.

Until next time...
Mike


Stumble this post

Sunday, November 27, 2011

Make It Merry

14 Days and 14 DIY Ideas with Make It Merry is off and running! In fact...it's day three, so don't miss out on the first two posts:

Day 1:  Kassi at Truly Lovely
Day 2:  Vanessa at Nifty Thrifty Things

Day 3:
And today, Diane (our brain behind Make It Merry) shares her adorable handcrafted tree toppers and ornaments.


Don't miss a peek at her 'home sweet homemade' Christmas tree full of goodness!

I'll be joining all of the fabulous creatives in this event with my post on the 30th under the 'Holiday at Home' theme. I spent the day putting together large branches...so that's your first hint at what's happening here at Blue Velvet Chair.

Until next time...
Mike

Wednesday, November 23, 2011

Forest Glam DIY

Last night I whipped up a bit of forest glam DIY.

I don't know about you, but sometimes the only time I have to finish up projects is late in the evening...which means all my photos are either quite dark, or washed out with flashes. I really must work on that! Of course the fact that it starts getting dark here now at 3.30 in the afternoon doesn't help! Long summer days mean short winter days in Sweden.

Back to the glam. As different bits of my 1970s home get renovated, I'm ready to start adding my own touch of funkiness here and there. Our kitchen has been done for a while, but I got a sudden burst of DIY inspiration to splash a bit of personality on our run-of-the-mill spotlight lamp from IKEA.


So I grabbed a few curly-cue branches that I had sitting around and set them up on my run-of-the-mill spotlight lamp from IKEA.


OK...I'm starting to feel the forest glam love...but it's still missing something. Of course! Antique crystal bits!


I got these at a thrift-style market in Copenhagen, Denmark, when we 'went abroad' (all of a 3-hour drive from where we live) to visit Tivoli at Halloween. They are old crystal bits from chandeliers...when they had candles instead of lights. The round cup area catches dripping wax...and the little wire rings usually held little crystal drops - like the one in the photo. I originally bought them thinking I would use them in a mosaic wall hanging that is starting to form in my mind, because those little cups look like flowers when you hold them upwards. But alas, they find a new home now as the showstoppers in a forest glam lamp dressing.


I have some round glass baubles that match Lulu (our dining room chandelier) that I'm thinking about adding as well. But honestly, by the time I got these up and some photos taken, I was just too tired to think about it more, let alone get out a tripod so that my night photos wouldn't be so blurry. Something for me to contemplate. To bauble, or not to bauble, that is the question.

For now I'll just be happy with my little touch of forest glam.

Until next time...
Mike


Stumble this post
Also linked up at:
Tip Junkie
DIY Showoff
Related Post for bluevelvetchair.blogspot.com