
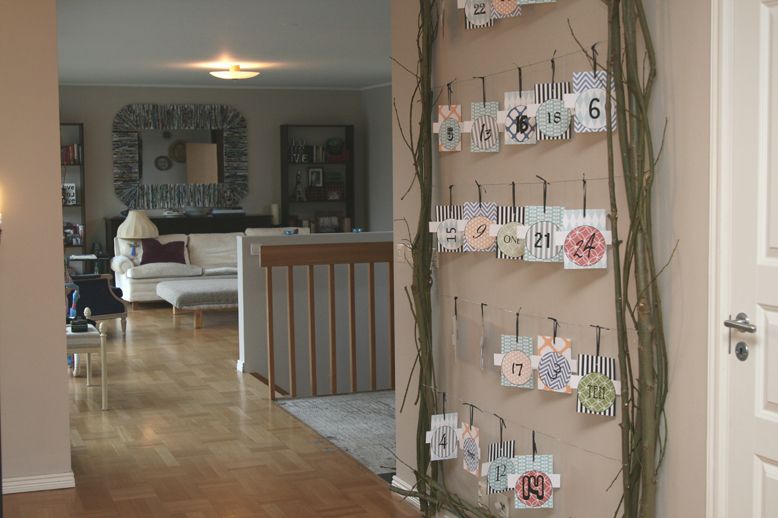
Here's the sneak peek at my "Forest Funky" advent calendar that I'll be featuring today.
Just a bit of logistics. I've got so many photos for this project so I hope that everyone can easily load this post. I'll also post all the photos on the Blue Velvet Chair facebook page if you're interested. And now, time to show and tell!
When my kids started to ask for their typical annual advent calendars this year, I suggested that we make a big one for an empty wall in our dining area. They jumped aboard and I'm so glad they did, because this one also doubles as holiday decor. It all started with a pretty good pile of twigs and branches collected from the forest - there's no shortage of forest in Sweden - some screws, and a drill used as a screwdriver.

My dining room floor became my workroom and I grabbed the largest branches to make a frame which I screwed together at the corners. Then I began weaving smaller branches in and around the main branches that formed the frame. No more screws, no glue, just weaving and twisting.

Next I headed downstairs to print out some fun numbers and backgrounds. I decided to use the free backgrounds by Aimee at Sprik Space. I mentioned these backgrounds a couple of months ago when I made some business cards for a market, and I like them so much that I decided they would be perfect for our forest funky advent calendar.
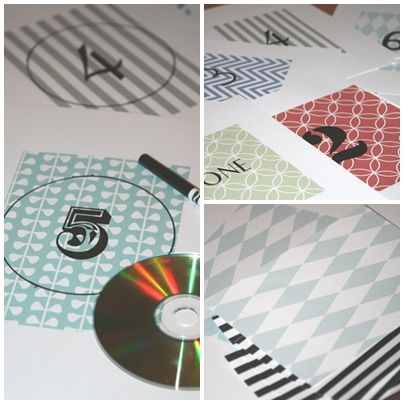
I used Photoshop to print numbers in different fonts on the backgrounds from Aimee after I resized her files to a 5x7 size (A5 for the Europeans), and then used a CD to draw a circle around the numbers. There's no Silhouette in this household, so off I went to cut the circles out by hand. If you cut on the outside of the black line there will be a little black border left on the circles to give that extra accent. I also printed some 5x7 backgrounds without numbers and used them as the backdrop for the circles. I arranged everything on the floor to get the right colors and balance before I started gluing.

After a big of gluing and punching holes in each card (single hole punch), I used a nice little black and white ribbon to string the dates randomly on the forest frame.


Now my forest funky advent calendar was almost done...and just in the nick of time (since it starts tomorrow)! Here's how the kids will see it...

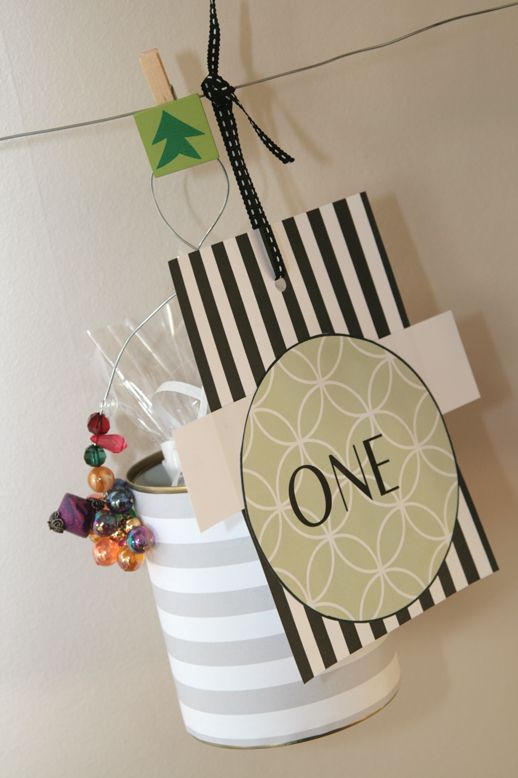
But what about the little surprises? Well...I have a son who just can't resist a good peek when given the chance. So instead of hanging all the little goodies on the advent calendar at once, I've made a little traveling surprise carrier that will move from day to day according to the date. All you need is a tin can, one of the printed backgrounds, a bit of ol' wire and some beads. I started with buttons (as you see in the supplies photo), but wasn't getting the effect right, so I switched to beads.

I don't know about your kids, but mine are at the age where they are really curious about their baby photos and what they did when they were younger. So several of the dates on the advent calendar this year will hold a little gift of memories from previous Christmas holidays. Day 1 includes a little packet of mini photos that I printed out for them to have - they can carry them around, bend them, put their little fingerprints all over them, and do the things that kids normally do with photos that we parents cringe over. This is their own little set. They show our Christmas from 2008 when we flew to the Canary Islands for a sunny getaway during Sweden's dark winter. It was one of our best Christmas holidays ever!

OK. Snapped back to reality!
Their first little surprise packet holds Christmas memories - and of course a little something sweet.

Wrap up the little goodies in some cellophane paper for the traveling carrier. To make the carrier, simply glue the paper to the can, string the beads on your wire, punch a couple of holes in the sides of the tin can, and you'll be able to figure out the rest.

Held by a little clothes pin, the traveling carrier will have new surprises on each date when the kids wake up.

And there you have it. The forest funky advent calendar.

Couldn't let the scraps go to waste from the circle cut-outs, so I cut some pieces and made a paper mosaic tree for the bottom of the advent calendar.

The forest frame will also double as our Christmas card holder this year.

Whew! Just one more photo to go. I hope that my forest funky advent calendar gives you a little inspiration to create something special and 'uniquely you' this holiday season.

Click through for more inspiration on the Make It Merry graphic below.
And a big thanks to Diane at Home Sweet Homemade for putting together a fabulous event filled with inspiring creatives. Diane has been a big part of my own inspiration for button flowers and rolled magazine pages.
Until next time...
Mike
Stumble this post

I love your advent calendar. What a fantastic job. I'm part of the Make it Merry series so it's great to connect.
ReplyDeleteI love this advent calendar! I featured you on the Sprik Space FB page today. :)
ReplyDeletethis is the most impressive advent calendar I've ever seen! You are absolutely the most imaginative blogger ever Michael ~ seriously! What a treat to interact with this lovely work of art all month long - thank you for sharing :) xo, diane
ReplyDeleteWhat a great idea! I love the traveling tin can :)
ReplyDeleteHappy Holidays!
Love it, can't wait to see it on Sat. You are awesome. See you soon.
ReplyDeletelaurie
so inventive...and upcycling to the upmost! I'm sure your little ones will enjoy it all month long!
ReplyDeleteVery nice Advent calendar with pleasant memories for the family to share again. It is great that you will use it as Xmas decoration! And I really like that it is BIG! :-)
ReplyDeleteI will have a similar calendar with photos as a surprise for my husband from the best moments of our year 2011. I plan to use big empty golden frame.
But I really, really like your frame of branches - it is absolutely great and gives the feeling of the nature being inside home! Thank you for sharing it!
Laura
OH Mike that is incredible! I LOVE the whole idea of it and the natural decor it provides in your home! Such a great idea to give the kids mini photos too! (I might have to steal that idea for my girls!)
ReplyDeleteJill @ Creating my way to Success
http://www.jembellish.blogspot.com/
How clever and lovely! Well done.
ReplyDeleteOkay.....NOW I wish I had some wee ones around as an excuse to MAKE one!
ReplyDeleteThe tin can is just the icing on the cake for this whole idea. It's awesome!! And I adore the 'kids view' of the whole works. How can they NOT adore it! Well done, you!!
That is amazing! I love the twig frame, and that traveling can is pure genius!
ReplyDeleteTHis is so much fun, I love the rustic elements, way to go!
ReplyDeleteCarlee
www.ladybirdln.com
so charming, rustic, and sweet!
ReplyDeletemichele
This is really a lot of fun and very creative! I really like the twig frame. You could use that idea to showcase so many things. I'm sure your kids will love this. I have a little advent box that I painted last year but it's small so I'm limited to the candy and what not to put in it. The little pictures are a great idea because they do so love to carry them around!
ReplyDeleteLove this! I don't have any tree limbs laying around to use, but we do have a big picture frame I could do something similar with for next year. Love the can you can move to each day, too! Clever!
ReplyDeleteWhat an amazing idea. I love the giant stick frame. I love your blog. I'm your newest follower. Would love you to stop by DIY Home Sweet Home
ReplyDeleteJamie
http://diyhshp.blogspot.com/
P.S. I have a linky every Monday would love you to stop by Monday and link up.
Wow, that is a stunning Advent calendar! I absolutely love that it takes up an entire wall! I'd be thrilled if you shared this at the Head to Head Showdown, going on right now at www.icantstopcrafting.blogspot.com ~Jen
ReplyDelete