

Summer dress #2 is now complete.
I was just about to send away an old shirt that was too small for me. But I just love the pattern because it’s filled with American images and feels like home (even though the shirt was purchased here in Sweden).


What was I thinking? It would make a cute little summer dress for Mia (which seems to be my first thought for every piece of clothing I get rid of right now). Time to pull out the borrowed sewing machine and open my stash of knitted doilies that I collected a while back with good intent to decorate some funky clothing items for my little half-breed chica.

Because I have no sewing training, and because I have very limited patience for prep work, I once again did everything by eyeballing it instead of any serious pattern measurements. Big tip: using as many existing seams as possible goes a long way with my kamikaze sewing style.
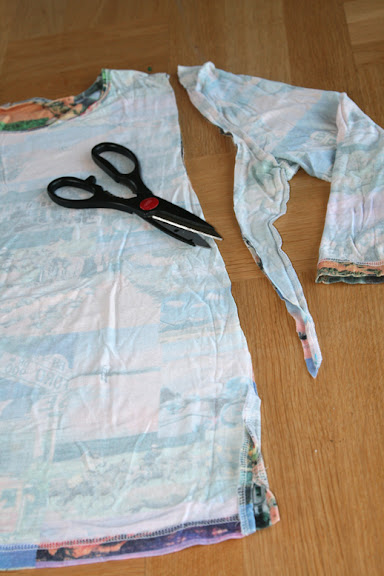
It was pretty straight forward. Figure out how wide you want the straps of the dress to be, and set a pin there. Then cut from that point down towards the bottom of the shirt, creating an A form. Again, I just eyeball it.

Then I put another pin at the point that would be the bottom of the armhole. I folded over enough to make a seam and stiched around what would become the armhole area. Then, with the material wrong side out, I stiched from the armhole down the side to the bottom seam - which was already done as it was the original bottom of my shirt. Repeat same thing on other side. In the end it is a no-fuss A-frame girl’s dress.


But it’s missing something. Embellishments! In come the doilies. I tried laying a few different colors, sizes and patterns on the dress to see what fit best. These doilies were all picked up cheap at 2nd hand shops, so I’ve created a nice little stash to choose from.

In the end I chose a layered effect. The bright blue is actually an old-fashioned knitted dishcloth (properly disinfected in my washing machine, of course). With a cute little crocheted (I think) white doily accented with a couple of buttons from my collection.

I couldn’t just throw the arms of the shirt away, so I stiched a seam on the cut end and voila! A pair of matching little leggies.


I have a feeling that Mia’s summer wardrobe is going to be quite the experiment for me. Thank goodness she doesn’t mind being the guinea pig!


Michael
p.s. If you enjoyed this post, I hope you'll become a follower of my blog and a fan on FB.

so absolutely adorable. LOVE IT. LOVE THE PICTURES YOU TOOK TOO.
ReplyDeleteI wish I could tell you more about the link buttons on my blog (fb, twitter, etc.) BUT- I have no clue I leave all that stuff up to my blog designer she did them for me. Sorry. Try asking some other bloggers? winks-jen
GREAT t-shirt refashion (great t-shirt fabric, I can see why you wanted to keep it!) I love that you made legwarmers from the sleeves too!
ReplyDeleteI would love if you came over and linked this project to my weekly Round Tuit party at:
http://jembellish.blogspot.com/
I also have a whole page long-term linky for clothes upcycling projects if you want to share this there too!
Oh and I'm a new follower too - since I enjoyed this post and you asked!!
Have a great week!
Jill @ Creating my way to Success
Seriously, SO CUTE! Mia and the dress both! :)
ReplyDeleteHi from your newest follower. Love your creations, I too love to upcycle!
ReplyDeleteKarima from
www.karimascrafts.com
and
www.karimasblogs.blogspot.com
Hey Mike,
ReplyDeleteI have an awesome skirt that I am getting rid of that would make an adorable dress for Mia and it is a cool fabric too. We have to get together so I can get it to you.
laurie
Oh my gosh, that is precious! And the little girl is just as sweet. LOVE this! Thanks for sharing at For the Kids Fridays! So happy to have you linking up!
ReplyDeleteSo cool!!!!
ReplyDeleteShe is stylin'! It turned out so good!
ReplyDeleteSuch a cute dress! I would love to feature this on Reduce, Reuse, Upcycle. Feel free to stop by and grab a featured button. Thanks!
ReplyDeletehttp://reuseandupcycle.blogspot.com
Thanks for all the comments, everyone! I love these experiments...really enjoying myself. Did you get to see my latest with the vintage souvenir scarf dress?
ReplyDeletebeautiful thank you so much
ReplyDeleteAmazingly adorable. My 12 year old would drool over this!
ReplyDelete