
Remember when I showed you the DIY baby shower decorations I made for a friend recently - and promised I'd post the how-to for them? Well, I'm finally getting back to that, starting with the 'C is for Carter' wall hanging.

Now for the life of me, I have no idea what I did with the photos I took at the very beginning of this project. So, I'll talk you through some of the earlier steps, and then the photos will kick in.
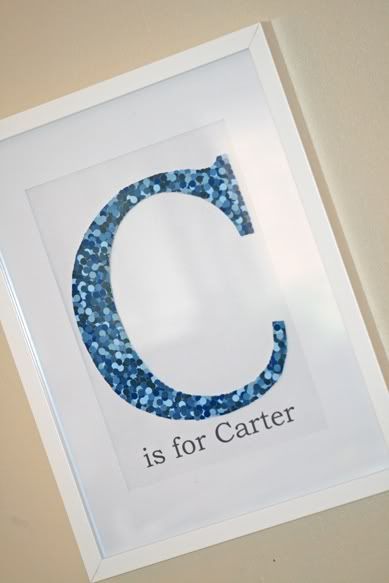
First up was a simple Photoshop text layout (A4 or 8.5 x 11). You could do this in Word as well...but it is just a bit harder to maneuver the spacing between the C and the lower text. Choose your font and make 2 copies (always good in case you make a mistake). Then I cut the large 'C' out and used it as a guide to cut out a thicker 'C' on a cereal box (that's where the beloved recycle-repurpose comes in...use whatcha got!).

Next up was a lot of punching out dots with a single-hole puncher. Use paint chip cards from your local DIY store - the kind with 5 different shades on them. I punched out dots at home, I punched in the car (as a passenger, of course), I punched while sitting and waiting for my son at the skate ramp park, I punched out dots everywhere I could. At one point I said to my husband, "Aren't you even going to ask me what I'm doing?" He looked over at me, and after a few seconds he said, "Starting your own confetti company?" Smart-ass!
Then I started doing the same with the gluing. I glued in the car on the way to our mini-vacation. I glued while waiting for my son at the skate ramp park. I glued at home. I glued everywhere.
Here's where the warning comes in. This is one of those projects that seems like a really good idea in the beginning, but somewhere during the process you realize the excessive amount of time and patience required and it soon becomes a true labor of love to finish.
Because I wanted a combination of the blues, each dot had to be glued on individually to avoid the white on the backside. If I were willing to have a mix of white and colored dots, then I would have tried tossing a bunch of dots on at the same time to see what stuck - then gone back in to fill in individual spaces. But no, I chose the first option, and was soon too far in it to try option #2. It took several layers and hundreds of dots to cover all of the spaces completely and create the final effect that I was looking for.

I glued the original 'C' cereal box that I had used for the base to another cereal box to create an even thicker 'C' to work with. Plus I wanted it to 'pop' off the background, even if ever-so-slightly. Then I cut around the edges, ending up with just a 'C' again.

Then I printed out the original layout again, but this time without the large 'C' layer - only the bottom text saying 'is for Carter'. I used blue tack to attach the large 'C' to the layout, pulled out the IKEA frame I had purchased for the project, and taped the layout page to the mat board.

Flip the mat board over and you are ready to frame it - which was super easy with the IKEA Ribba frames.


Before I started this project I was already making plans to make my daughter's full name, as well as another gift for a friend. Needless to say, the time it took to complete this project is enough to put a halt to that! Not sure if either of those will happen now.

I was super happy with the results, it was a crowd pleasure, and the 'C is for Carter' wall hanging now has a home in the baby nursery. But it was definitely a lesson in patience for me...useful now and again.
A big thanks to Ally M for giving me the original inspiration to try this.
Until next time...
Michael
Wow.. this C is SO CUTE! I can't believe it's so easy to make, too. I never would have guessed it would be that easy to do. I really appreciate that you shared the tutorial... I hope it's okay, I have featured your C is for carter gift on my blog today.. You can see it here:
ReplyDeletehttp://crafteronabudget.blogspot.com/2012/03/diy-baby-shower-gift-ideas.html
Thank you so much for sharing!!
I did this today. With an M turned out amazing!
ReplyDeleteHa ha, I love "this is one of those projects that seems like a good idea in the beginning..." I have had plenty of those projects, and it can be hard to finish when you realize how time intensive it's become. I love the end project! Soooo cute!
ReplyDelete